How to configure Kodak Smart touch with PaperVision Tools
Version: R69
Article ID: PT000002

Description
Summary
This article demonstrates how to configure the Kodak Smart touch and PaperVision Tools to use single-button scanning.
To configure follow the steps below:
- Launch the Kodak Smart touch configuration console by right-clicking the Kodak scanner icon in the System Tray and selecting “Configure”.
- Choose a Smart touch number to associate with PaperVision Tools. The example in this article will use ‘9’ as the Smart Touch number.
- Click the “Rename…” button at the top of the configuration console and give the task an appropriate name such as “PVETools”.
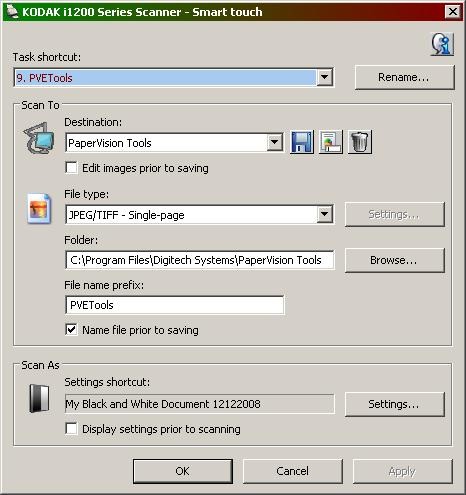
4. Choose “Application” from the Destination drop-down menu.
5. Click the disk icon* and give the Destination Name a value of “PaperVision Tools”.
6. Click the “Browse...” button and select “PVEExplorerShortcut.exe” from the PaperVision Tools working directory, in this case "C:\Program Files\Digitech Systems\PaperVision Tools\PVEExplorerShortcut.exe".
7. Press OK, you are ready to use PVE Tools with Smart touch.
8. Load documents in the scanner, select Smart touch number 9 and press scan.
9. In the PaperVision Tools Console, check the box ”delete local copies” if you do not wish to keep the scanned images saved in the “Folder” path specified in step 7 once they are added to PaperVision.
*Additional Requirements: This article assumes that the user already has PaperVision Tools, Kodak Smart touch version 1.3.08042201 (Kodak Smart touch must be updated to this version otherwise some required functionality will be missing) and a compatible Kodak scanner installed and operational. Note that the user needs to select a multipage file format if scanning multiple pages to a single document.